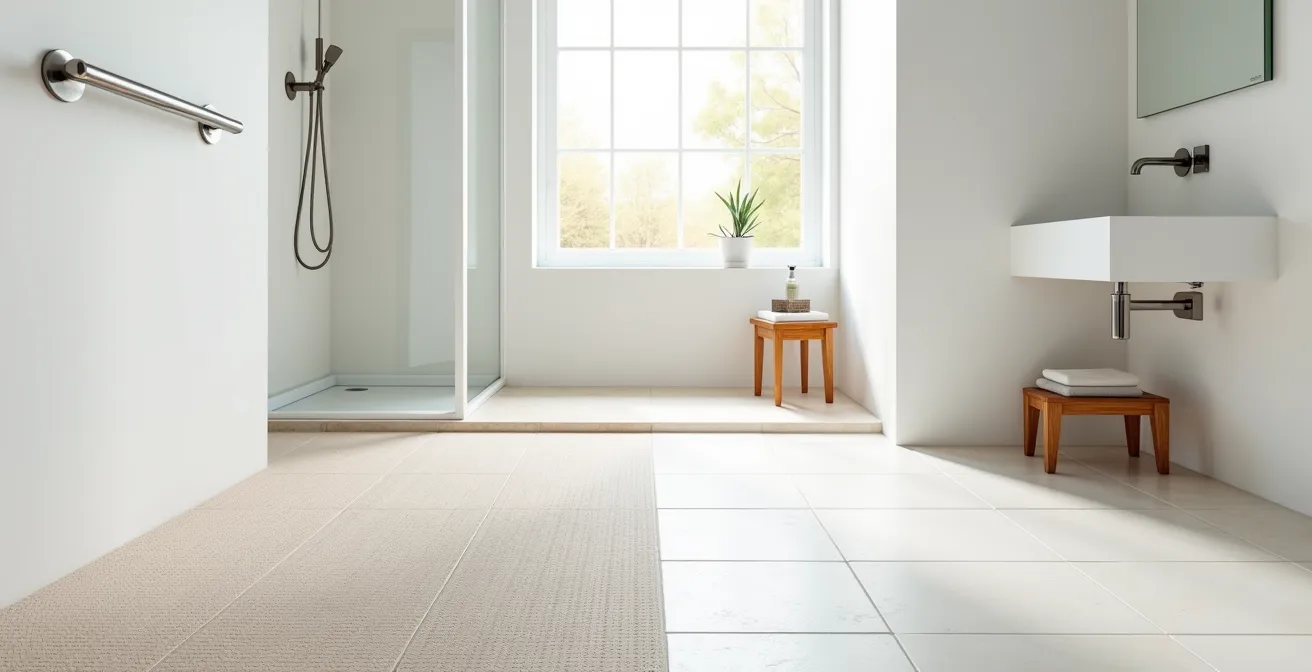
The longevity of a bathroom safety solution is not determined by product choice alone, but by engineering a compatible system of surfaces, maintenance, and user aids.
- New, correctly rated tiles (R10+) offer the most durable foundational safety, but only if maintained with pH-neutral cleaners that preserve their texture.
- Anti-slip coatings are a cost-effective retrofit, but their lifespan is directly tied to meticulous surface preparation and avoiding abrasive or film-forming cleaning agents.
Recommendation: First, assess the condition of your existing surfaces. If sound, a professionally applied coating with a strict cleaning protocol offers the best value. If tiles are worn or damaged, a full replacement with R11-rated tiles is the superior long-term capital investment.
The decision to upgrade a wet room for senior safety often presents a stark financial and logistical choice: a quick, affordable treatment or a costly, disruptive tile renovation. Homeowners rightfully question which path provides not just immediate safety, but lasting, reliable slip resistance. Common advice often points towards simple fixes like rubber mats or spray-on coatings, but these recommendations frequently overlook the critical variables that determine true long-term performance. From a materials engineering perspective, this is not a simple question of “good” versus “bad” products. It’s about understanding the physics and chemistry at play on your bathroom surfaces.
The true durability of any anti-slip solution is governed by a system of interconnected factors: the inherent surface porosity of the material, the chemical compatibility of the cleaning products used, the mechanical wear from foot traffic, and the buildup of soap scum and oils, known as biofilm. An expensive new tile installation can become dangerously slick in months if cleaned improperly, while a correctly applied and maintained chemical treatment can outperform it. The CDC data is stark, revealing that a significant number of senior falls occur in the bathroom, making this an engineering problem with serious human consequences.
This article moves beyond a simple product comparison. Instead, it provides a cost-conscious, analytical framework for evaluating your options. We will deconstruct the performance of tiles, coatings, and accessories, examining the scientific principles behind their effectiveness and failure points. By understanding these factors, you can make an informed decision that prioritizes not just initial cost, but the total cost of ownership and, most importantly, sustained safety over time.
This guide will walk you through the critical components of a safe and durable wet room system. By breaking down each element, you can build a comprehensive understanding and create a solution tailored to your specific needs and budget.
Summary: Anti-Slip Treatments vs. New Tiles: A Durability Analysis
- Why ‘R10’ Rated Tiles Are the Minimum Standard for Senior Showers?
- How to Apply Anti-Slip Coatings to Enamel Tubs Without Peeling?
- Rubber Mats or Adhesive Strips: Which Is More Hygienic for Daily Use?
- The Cleaning Product Mistake That Destroys Anti-Slip Coatings
- When to Re-Apply Chemical Anti-Slip Treatments for Continued Safety?
- Deep Clean Service vs. Maintenance Maid: What Does Your Parent Actually Need?
- When to Switch from Slippers to Indoor Shoes for Stability?
- Where to Position Grab Bars in a Tiled Shower for Maximum Leverage?
Why ‘R10’ Rated Tiles Are the Minimum Standard for Senior Showers?
When specifying a new tile floor for a wet room, the most critical factor is its certified slip resistance, quantified by an “R” rating. This rating measures the dynamic coefficient of friction on an inclined, oil-covered surface. While ratings range from R9 (low resistance) to R13 (very high resistance), R10 is the absolute minimum standard for residential wet areas, especially those used by seniors. An R9 tile, common in standard residential construction, is simply insufficient for the predictable presence of water, soap, and shampoo. Opting for a lower rating to save on initial material cost is a false economy that externalizes the cost onto increased fall risk. A bathroom is a uniquely hazardous environment; CDC data reveals that up to 80% of senior falls happen in the bathroom, making surface selection a primary engineering control.
The choice should ideally be R11 or even R12 for the direct shower floor, where the constant presence of soapy water creates a slick biofilm. These higher-rated tiles have a more pronounced microscopic texture, or surface porosity, which provides better grip even when contaminated. However, this increased texture comes with a maintenance trade-off. The deeper crevices that provide grip can also trap dirt and soap scum, requiring more intensive cleaning with specialized brushes. Therefore, the decision between R10 and R11 involves balancing the required safety level with the physical ability of the senior or a caregiver to perform the necessary upkeep. For a walk-in shower, R11 is the superior choice for safety; for the general bathroom floor area outside the shower, R10 is often a sufficient and more easily maintained compromise.
How to Apply Anti-Slip Coatings to Enamel Tubs Without Peeling?
For existing enamel or acrylic bathtubs, a professionally applied anti-slip coating is a highly effective and cost-conscious alternative to a full replacement. The primary failure mode of these coatings is peeling or delamination, which is almost always caused by improper surface preparation rather than a faulty product. The smooth, non-porous surface of an enamel tub offers very little for a coating to mechanically “grip.” Therefore, the goal of preparation is to create a clean, microscopically abraded surface that promotes a strong chemical bond.
The process must begin with a rigorous deep cleaning using a specialized degreasing agent to remove all traces of soap scum, body oils, and silicone from previous cleaning products. This is the most critical step. Following the cleaning, the surface must be thoroughly rinsed and allowed to dry completely. A light abrasion with fine-grit sandpaper or a chemical etchant is then used to create the necessary surface profile. Only then can the coating be applied. Proper ventilation is not just a safety measure; it is essential for the coating to cure correctly, as trapped moisture or solvents can compromise the bond and lead to premature failure.
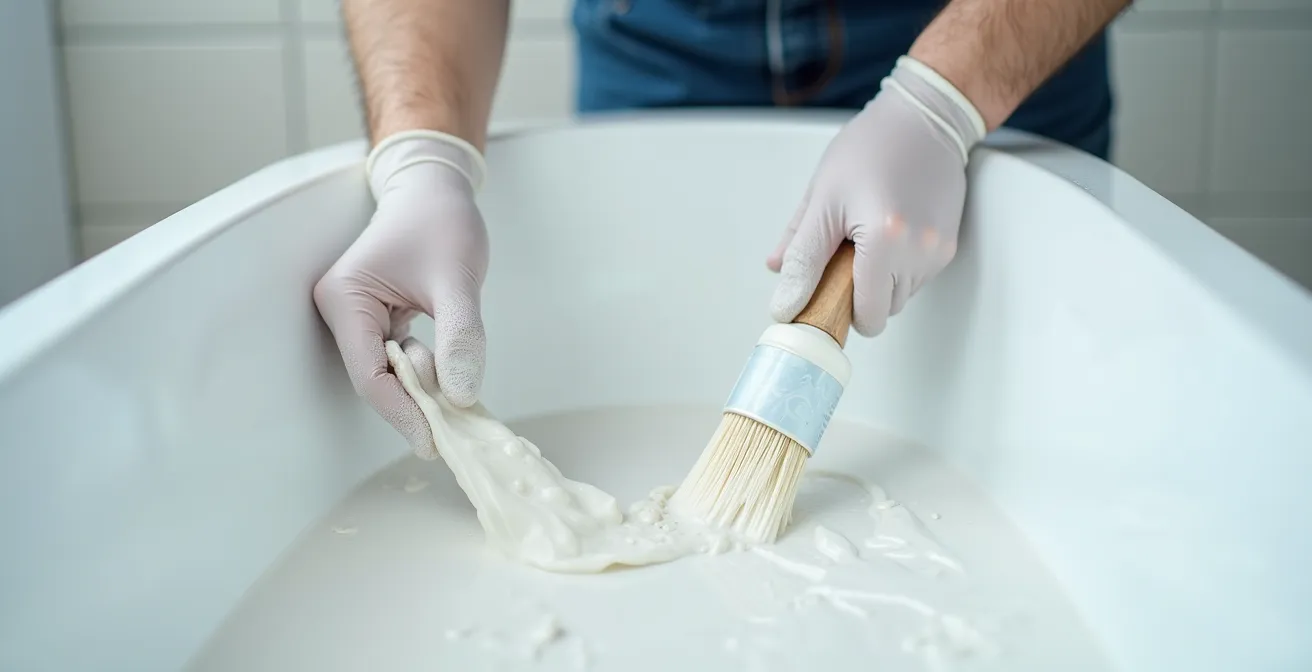
The difference in longevity between a DIY application and a professional one highlights the importance of this meticulous process. A professional has access to industrial-grade cleaning agents and the experience to ensure the surface is perfectly prepped.
Case Study: DIY vs. Professional Application Cost Analysis
SlipDoctors reports that professional anti-slip coating applications typically last 3-5 years with proper maintenance, while DIY applications using their epoxy aerosol products achieve 2-3 years durability. The key difference lies in surface preparation – professionals use specialized cleaning agents and proper ventilation equipment, reducing peeling risk by up to 75% compared to DIY attempts.
Rubber Mats or Adhesive Strips: Which Is More Hygienic for Daily Use?
Rubber bath mats are often seen as the simplest and cheapest anti-slip solution, but from a material and hygiene standpoint, they are deeply flawed for daily use by seniors. While their suction cups provide initial stability, the underside of the mat creates an ideal environment for the rapid growth of mold, mildew, and bacteria. The mat traps a layer of warm, soapy water against the tub surface, creating a persistent biofilm. This requires the user to lift a heavy, wet mat after every use for cleaning and drying—a physically demanding task that is often impractical for an older adult.
Adhesive strips or appliqués, while still a surface addition, present a more hygienic and lower-maintenance alternative. Because they are applied individually with space between them, water can drain freely around them, significantly reducing the trapped moisture that fosters mold growth. While the edges of the strips can still trap some soap scum, the overall biofilm formation risk is substantially lower. The physical effort required for maintenance is minimal, involving simple scrubbing around the strips during regular shower cleaning, with no heavy lifting required. From a total cost of ownership perspective, adhesive strips also prove more economical due to their longer replacement cycle.
The following table, based on data from senior care resources, breaks down the practical differences in maintenance and hygiene between these two common options. An analysis of the data clearly shows that for long-term, low-effort use, adhesive strips are the superior engineering choice.
| Factor | Rubber Mats | Adhesive Strips |
|---|---|---|
| Weekly Cleaning Time | 15-20 minutes (lifting, scrubbing both sides) | 5-7 minutes (wipe around strips) |
| Biofilm Formation Risk | High – trapped moisture underneath | Low – water drains freely |
| Replacement Frequency | Every 3-6 months | Every 12-18 months |
| Physical Effort Required | High – must lift wet 2-3 lb mat | Low – no lifting required |
| Mold Growth Potential | Very High – dark, moist environment | Moderate – edges can trap soap scum |
The Cleaning Product Mistake That Destroys Anti-Slip Coatings
Investing in a high-quality anti-slip tile or a professional coating is only half the battle. The single most common cause of premature failure for these surfaces is the use of incorrect cleaning products. Many standard household bathroom cleaners contain agents that actively degrade or mask the microscopic texture responsible for slip resistance. Abrasive powders, for example, physically wear down the delicate peaks and valleys of the surface, effectively polishing it smooth. Bleach and ammonia-based products can cause chemical degradation of certain epoxy or urethane coatings, making them brittle and prone to peeling.
Perhaps the most insidious culprits are cleaners infused with oils or silicones, often marketed for their “shine.” These products leave behind an invisible, slick film that fills in the surface’s microscopic pores, completely negating its anti-slip properties. The user may think the surface is clean, but its coefficient of friction has been dangerously reduced. The correct approach is to use a pH-neutral cleaner specifically formulated for treated or textured surfaces. For stubborn biofilm, enzyme-based cleaners are an excellent choice as they digest organic matter (oils and soap scum) without harming the underlying material. The difference in surface lifespan is dramatic; coating manufacturers report a 3-5 year lifespan with correct cleaners versus 6-12 months when harsh chemicals are used.
Maintaining a safe surface requires a strict cleaning protocol. Using the wrong product is not just a cleaning mistake; it is a costly reversal of your safety investment. The following list outlines the chemicals to use and those to avoid entirely:
- AVOID: Bleach, ammonia, abrasive powders, citrus-based cleaners, and oil-based products.
- AVOID: Any cleaner containing silicone or advertising a “wax” or “shine” finish.
- USE: pH-neutral cleaners specifically labeled for use on treated or sensitive surfaces.
- USE: Enzyme cleaners designed to break down biofilm without damaging the coating material.
- RESTORATION: If a treated surface begins to feel slick, deep clean it with a specialized degreaser to strip any potential film buildup, then rinse thoroughly.
When to Re-Apply Chemical Anti-Slip Treatments for Continued Safety?
Unlike a one-time tile installation, chemical anti-slip treatments are a sacrificial layer or surface modification that wears down over time. Relying on a simple calendar-based schedule (e.g., “re-apply every two years”) is unreliable because the rate of wear depends heavily on usage frequency, cleaning methods, and water hardness. A more accurate, data-driven approach is necessary to determine the precise moment when the treatment is no longer providing adequate protection. The key is to visually monitor how water behaves on the surface.
A fresh, effective anti-slip treatment, whether a coating or a chemical etch, creates a hydrophobic surface. This causes water to “bead” into distinct droplets. This beading is a visible indicator that the microscopic texture is intact and capable of providing grip. As the surface wears down or becomes clogged with mineral deposits and biofilm, its hydrophobic properties diminish. Water will stop beading and instead form a continuous, unbroken film—a phenomenon known as “sheeting.” This is the critical warning sign. Sheeting indicates that the surface has lost a significant amount of its texture and its coefficient of friction is dangerously low.
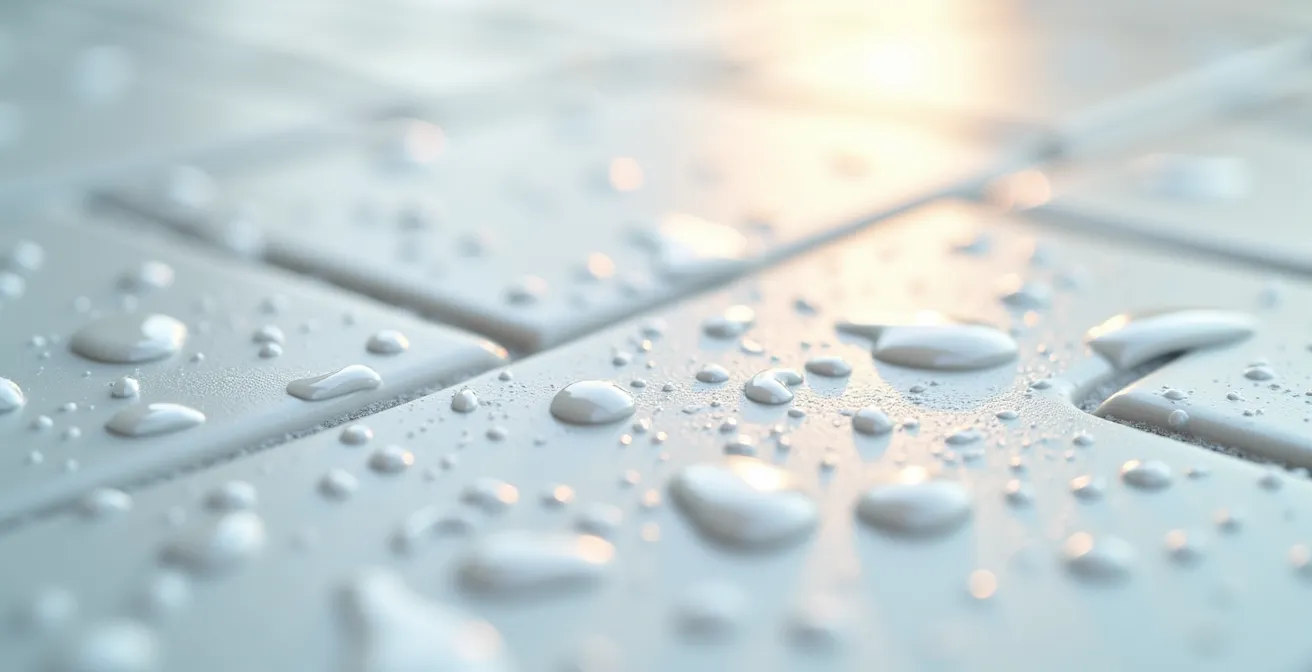
This simple visual test provides a real-time assessment of the surface’s condition, allowing for re-application based on actual performance rather than an arbitrary timeline. It transforms maintenance from guesswork into a simple, observational process.
Case Study: The Water Sheeting Test for Treatment Effectiveness
Field testing from anti-slip specialists shows that when water stops beading and starts ‘sheeting’ across a surface, the microscopic etches created by a chemical treatment are approximately 70% worn or clogged. This typically occurs after 18-24 months in a single-user bathroom but can happen in as little as 6 months in high-traffic settings or in homes with hard water (over 180 ppm mineral content), demonstrating the unreliability of a fixed re-application schedule.
Deep Clean Service vs. Maintenance Maid: What Does Your Parent Actually Need?
Maintaining the engineered safety system of a senior’s bathroom often requires outside help. However, there is a critical distinction between a standard maintenance maid service and a specialized deep cleaning service, and choosing the wrong one can inadvertently compromise safety. A typical maid service is focused on general tidiness and surface-level cleaning. Their staff may not be trained on the specific requirements of anti-slip surfaces and may use generic, all-purpose cleaners containing bleach or abrasives that, as we’ve established, can destroy the floor or tub’s protective texture.
A specialized deep cleaning service, particularly one focused on senior or accessible homes, should operate with a greater understanding of material science. Their staff should be trained to identify different surface types and use the appropriate pH-neutral or enzyme-based cleaners required to preserve them. When hiring a service, the focus should not be on the frequency of visits, but on the methodology and materials they use. The goal is not just to have a clean bathroom, but to have a bathroom whose safety features are properly preserved.
Before engaging any service, it’s crucial to ask specific, qualifying questions to assess their expertise. Ask them directly: “What specific products do you use on treated bathroom tiles and anti-slip coatings?” Their answer should confirm they use non-abrasive, pH-neutral solutions and avoid harmful chemicals. Also, ask: “Are your staff specifically trained on maintaining different bathroom surface types?” A positive answer indicates they understand the difference between standard ceramic and a specialized, textured safety surface. This vetting process ensures you are hiring a partner in maintenance, not just a cleaner.
When to Switch from Slippers to Indoor Shoes for Stability?
The safety system of a wet room extends beyond its fixed surfaces to include the interface between the user’s foot and the floor. Traditional, soft-soled slippers become a liability in and around the bathroom. They absorb water, offer minimal tread, and lack the structural support needed for stability, especially for a senior with reduced balance. The appropriate solution is a dedicated pair of indoor shoes with a firm, supportive structure and a rubber sole designed for grip on wet surfaces.
The transition from slippers to indoor shoes should be made as soon as any mobility or balance concerns arise. The shoe’s sole acts as the final component in the slip-resistance system. An effective indoor shoe for this purpose will have a sole with deep, multi-directional tread channels that actively disperse water from under the foot, similar to a car tire on a wet road. This prevents hydroplaning and maintains direct contact between the sole and the floor’s textured surface. The shoe’s structure also provides crucial ankle support, reducing the risk of a fall even if a slight slip does occur. As one user’s experience shows, combining appropriate aids with safer behaviors and footwear creates a multi-layered defense against falls.
A 71-year-old user reported: ‘I content myself with using a shower seat and kneeling to wash my hair. I can get up from kneeling by pulling on the shower seat.’ This testimonial highlights how proper footwear combined with bathroom aids creates a safer environment for seniors with varying mobility levels.
– AgingCare User
Selecting the right footwear is not a matter of style, but a technical choice. It requires a practical testing protocol to ensure performance in the specific environment where it will be used.
Your Action Plan: Wet Footwear Testing Protocol
- Test chosen indoor shoes on the wet bathroom floor while holding a grab bar for safety.
- Check the sole’s flexibility; overly rigid soles can reduce surface contact on textured anti-slip tiles.
- Verify the sole has drainage channels to prevent water from pooling under the foot, which can cause hydroplaning.
- Assess stability during the transition from a dry, carpeted surface to the wet tile.
- Plan to replace the footwear when the sole’s tread depth is visibly reduced, or measures below 3mm.
Key Takeaways
- The foundation of wet room safety is a surface with a certified R10 rating or higher; anything less is insufficient for senior use.
- The lifespan of any anti-slip surface is directly determined by the cleaning protocol; use only pH-neutral cleaners to avoid chemical or abrasive damage.
- True safety is a system: the interaction between floor/tub surfaces, grab bars for leverage, and appropriate, non-slip indoor footwear is what prevents falls.
Where to Position Grab Bars in a Tiled Shower for Maximum Leverage?
The final element of a comprehensive bathroom safety system is the installation of properly anchored grab bars. They are not passive accessories but active safety devices that provide the user with the ability to apply leverage to prevent or arrest a fall. Research demonstrates that people are 75.8% more likely to regain balance with a grab bar available during a slip. However, their effectiveness is entirely dependent on their positioning. Common practice often places bars in convenient but sub-optimal locations for leverage.
From a physics standpoint, grab bars should be positioned to counteract the most likely fall trajectories. As Jennifer Lawless, a senior center director, astutely points out, the placement should be considered from a dynamic, not static, perspective.
Positioning for ‘Fall Trajectory’, Not Just Movement. If a slip occurs at the center of the shower, where would a person’s hands naturally flail to?
– Jennifer Lawless, Banner Health
This means installing a diagonal bar on the main shower wall, which allows a user to catch themselves with a hand at various heights as they fall. A vertical bar should be placed at the shower entrance to assist with stepping over a curb, and a horizontal bar on the back wall provides stable support for adjusting water controls or for use with a shower seat. All bars must be professionally installed into wall studs or with heavy-duty toggle anchors; suction-cup bars are dangerously unreliable and should never be used for weight-bearing support.
By viewing the bathroom not as a collection of separate items but as an integrated safety system, you can make strategic, cost-effective decisions. The optimal solution is one where the floor surface, cleaning protocol, user footwear, and mechanical aids all work in concert to minimize risk. Begin your own bathroom safety analysis by evaluating these material and system components to engineer a truly durable and secure environment.