
Maintaining your mobility and independence after 70 is less about intense workouts and more about building smart, consistent “movement intelligence.”
- Even short periods of bed rest drastically reduce muscle strength, but this can be counteracted with simple “micro-activations.”
- Understanding pain signals and progressing exercises safely are far more important for long-term joint health than pushing through discomfort.
Recommendation: Start today by mastering a fundamental, safe balance exercise, like the single leg stand using a kitchen counter for support, to build a strong foundation.
The desire to remain active, independent, and safe in your own home is a powerful one. Yet, for many seniors over 70, the fear of a fall or joint injury can create a hesitancy that, paradoxically, leads to the very decline in mobility you wish to avoid. You may hear common advice to “just stay active” or “do some stretching,” but this guidance often lacks the structure and safety precautions needed to build real confidence.
What if the key to lasting functional mobility isn’t simply doing more, but moving smarter? The secret lies in understanding the “why” behind each movement. It’s about developing a new partnership with your body, one built on knowledge and gentle progression rather than outdated notions of “no pain, no gain.” True strength and stability come from mastering the fundamentals, from knowing how to prevent muscle loss even during periods of rest to using your environment as a tool for safety.
This guide is designed to be your encouraging partner on this journey. We will move beyond generic advice to give you specific, low-impact strategies you can perform safely at home. We will explore why even minimal activity is crucial, how to perform foundational exercises with proper form, what to look for in a mobility practice like Yoga or Tai Chi, and how to make your home and your mobility aids work for you, not against you. Your path to confident movement starts not with a leap, but with a single, well-understood step.
This article provides a comprehensive look at maintaining your mobility safely. Below is a summary of the topics we will cover to help you build strength, balance, and confidence in your daily life.
Summary: A Practical Guide to Home Mobility for Seniors
- Why Sarcopenia Accelerates Rapidly After Two Weeks of Bed Rest?
- How to Perform the ‘Single Leg Stand’ Safely Near a Kitchen Counter?
- Yoga vs. Tai Chi: Which Is More Effective for Fall Prevention?
- The ‘No Pain No Gain’ Myth That Causes Joint Injuries in Seniors
- When to Exercise to Maximize Joint Flexibility During the Day?
- Why Cable Brakes Are Harder for Arthritic Hands to Operate?
- Why Thick Area Rugs Are the Number One Trip Hazard for Walkers?
- Quad Canes vs. Standard Canes: Which Offers Better Stability for Post-Surgery Recovery?
Why Sarcopenia Accelerates Rapidly After Two Weeks of Bed Rest?
The term “use it or lose it” is especially true for muscle mass after the age of 70. The age-related loss of muscle, known as sarcopenia, can be a slow, gradual process. However, this process accelerates dramatically during periods of inactivity, such as being confined to bed due to illness or recovery. The body, sensing the muscles aren’t being used, begins to break them down at an alarming rate for energy. This is not a slow decline; it’s a rapid cascade that can significantly impact your strength and ability to function independently.
The science is stark: studies show that complete bed rest can cause a 15% loss of muscle strength per week. For a senior, losing that much strength in just seven days can be the difference between getting out of a chair with ease and needing assistance. This rapid muscle atrophy makes you more vulnerable to falls and makes the recovery process much longer and more difficult. It’s a vicious cycle where inactivity breeds weakness, and weakness encourages further inactivity.
The good news is that you can fight back, even from bed. The key is micro-activation. These are small, gentle movements that signal to your body that your muscles are still needed. They don’t require heavy lifting or even getting out of bed, but they are powerful tools in preventing the worst effects of sarcopenia. Even if you’re feeling very weak, performing these simple contractions can make a world of difference in preserving your strength for when you’re back on your feet.
Here are a few examples of micro-activations you can do while resting:
- Perform ankle pumps every hour while awake (10-15 repetitions).
- Execute glute squeezes, holding the contraction for 5 seconds (8-10 repetitions).
- Complete heel slides, dragging your heel along the bed surface (10 repetitions per leg).
- Rotate your ankles in slow, deliberate circles (10 circles in each direction).
- Practice isometric quadriceps contractions by tightening your thigh muscle, holding for 5 seconds, then relaxing (10 repetitions).
How to Perform the ‘Single Leg Stand’ Safely Near a Kitchen Counter?
One of the most effective exercises for improving balance and preventing falls is the single leg stand. It directly trains your body’s proprioception—its ability to sense its position in space. However, attempting this exercise without proper support can be risky. The kitchen counter is a perfect training partner: it’s stable, at the right height, and allows you to progress safely at your own pace. The goal isn’t to be perfect on day one, but to build confidence through a structured approach.
Begin by standing parallel to the counter, with your feet hip-width apart and your hand resting on the surface. Engage your core by gently pulling your belly button towards your spine. This creates a stable base. Shift your weight onto the leg closest to the counter and slowly lift the other foot off the floor. Don’t lift it high; just an inch or two is enough. Focus on keeping your standing leg strong and your hips level. The progression below provides a clear, safe path to mastering this fundamental exercise.
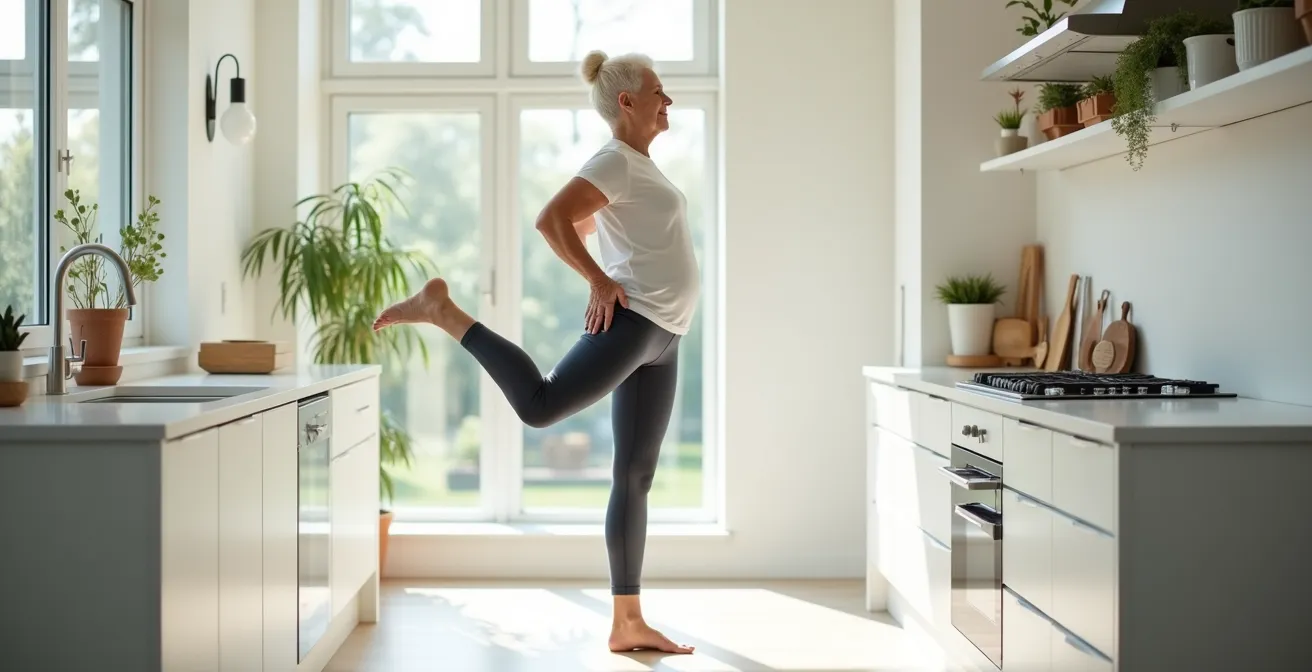
As the visual guide shows, your progression is measured by how much you rely on the counter for support. The aim is to gradually reduce your dependence as your balance improves. This builds not only physical stability but also the mental confidence to trust your body. Remember to breathe steadily throughout the exercise and perform it on both legs to ensure balanced strength.
This 3-level progression turns the exercise from a pass/fail test into a journey of improvement:
- Level 1 (‘The Anchor’): Hold the counter firmly with your full hand. Stand on one foot for up to 30 seconds. This is your foundation.
- Level 2 (‘The Pianist’): As you feel more stable, touch the counter with just your fingertips for balance. Aim to hold this for 30-60 seconds.
- Level 3 (‘The Safety Net’): The ultimate goal. Hover your hand about an inch above the counter without touching it, ready to provide support if needed. Maintain this for up to one minute.
Yoga vs. Tai Chi: Which Is More Effective for Fall Prevention?
When looking for a low-impact practice to improve balance, Yoga and Tai Chi are two of the most recommended options. Both are excellent for enhancing mobility, flexibility, and mindfulness. However, when the specific goal is fall prevention, they work in slightly different ways. Understanding their core focus can help you choose the practice that best aligns with your needs. Yoga often emphasizes static balance through holding poses, which builds muscle endurance and body awareness. Tai Chi, on the other hand, is built around dynamic balance, focusing on slow, flowing, weight-shifting movements.
For seniors concerned about falls, which often happen while moving, the dynamic balance training of Tai Chi can be particularly beneficial. It mimics the subtle, continuous adjustments your body must make while walking or turning. The practice of memorizing sequences in Tai Chi also provides cognitive benefits, enhancing the brain-body connection that is crucial for reacting quickly to a loss of balance. Yoga’s focus on sustained poses is fantastic for building ankle and core stability, which forms the foundation of good balance.
The following table breaks down the key differences to help you decide which might be a better fit for you. As research from a systematic review on fall prevention shows, both have merits, but one has a stronger evidence base for this specific outcome.
| Aspect | Tai Chi | Yoga |
|---|---|---|
| Primary Focus | Dynamic balance (weight-shifting movements) | Static balance (sustained poses) |
| Cognitive Benefits | Enhanced neuroplasticity through sequence memorization | Mindfulness and body awareness |
| Fall Prevention Evidence | Strong evidence: 24% risk reduction | Moderate evidence: improved flexibility |
| Best Movements | Parting Wild Horse’s Mane for weight shifting | Mountain Pose with heel raises for ankle stability |
| Breathing Technique | Deep diaphragmatic to prevent panic stiffness | Ujjayi breath for core tension |
Ultimately, the best practice is the one you enjoy and will do consistently. However, the evidence for fall prevention is particularly strong for Tai Chi. As the Frontiers in Public Health Research Team notes in their analysis:
Yang-style Tai Chi was found to be more effective than Sun-style Tai Chi, with effectiveness increasing with the duration and frequency of exercise.
– Frontiers in Public Health Research Team, Systematic Review and Meta-Analysis of Tai Chi for Fall Prevention
The ‘No Pain No Gain’ Myth That Causes Joint Injuries in Seniors
One of the most dangerous and outdated pieces of fitness advice is the “no pain, no gain” mantra. For seniors, applying this logic can lead directly to joint inflammation, chronic pain, and serious injuries that set your progress back for weeks or months. When it comes to exercising after 70, the goal is to stimulate your muscles, not annihilate them. A feeling of gentle muscle fatigue or a mild ache is a sign of a productive workout. Sharp, stabbing, or radiating pain is not a badge of honor; it’s a warning signal from your body that you need to stop.
Ignoring these signals can damage cartilage, strain ligaments, and cause inflammatory conditions like bursitis or tendonitis. The key to safe, long-term progress is learning to listen to your body and interpret its signals correctly. Instead of pushing through pain, think of it as a conversation. Your body is providing you with valuable feedback about what’s working and what’s too much. A smart, sustainable approach involves working within a range of moderate effort where you feel challenged but not pained.
To make this “conversation” easier, you can use a simple framework like a traffic light system. This turns the vague advice of “listen to your body” into an actionable tool. By categorizing what you feel, you can make an informed decision about whether to continue, modify, or stop your exercise. This approach empowers you to be your own best trainer, ensuring that every workout builds you up instead of breaking you down.
Your Pain Assessment Action Plan: The Traffic Light System
- Green Light (Continue): You feel muscle fatigue or a mild, generalized ache. This is the productive zone. It’s safe to continue your exercise.
- Yellow Light (Modify or Rest): You experience soreness that lingers for 24-48 hours after exercise. This is a sign to reduce the intensity, duration, or frequency of your workout and allow more time for recovery.
- Red Light (Stop Immediately): You feel a sharp, stabbing, or radiating pain during an exercise. Stop the movement immediately. If the pain persists, consult a healthcare provider.
- Check for Warning Signs: Pay attention to other signals, such as morning stiffness that lasts for more than 30 minutes, which can indicate underlying inflammation that needs to be addressed.
- Adopt a Safe Approach: Always aim for moderate effort, not maximum exertion. The goal is consistent stimulation to build strength and flexibility over time, not to push to your absolute limit in a single session.
When to Exercise to Maximize Joint Flexibility During the Day?
Have you ever noticed that you feel stiffer in the morning and more limber in the afternoon? This isn’t your imagination; it’s your body’s natural circadian rhythm at work. For seniors, especially those with arthritis, timing your flexibility and mobility exercises can make a significant difference in both comfort and effectiveness. Pushing through morning stiffness can be counterproductive and even painful. Instead, working with your body’s natural schedule allows for a greater and safer range of motion.
Research indicates a biological “window of opportunity” for exercise. Body temperature and cortisol levels (a natural anti-inflammatory hormone) tend to peak in the late afternoon. This makes your muscles and connective tissues more pliable and less prone to injury. Therefore, scheduling your main flexibility or stretching session for the late morning or early afternoon, once any morning stiffness has naturally subsided, is often the optimal strategy. This allows you to get the most out of your movements with the least amount of discomfort.
This doesn’t mean you should be completely inactive at other times. The concept of “movement snacks” is incredibly valuable. These are short, 5-minute bouts of gentle movement spread throughout the day. Tying these snacks to daily tasks—like doing gentle stretches while your coffee brews or after a walk—keeps your joints lubricated and prevents stiffness from setting in. This task-based approach makes movement a natural part of your day rather than a separate, daunting chore.
Consider this sample schedule for timing your movements:
- Before Gardening: Perform 5 minutes of dynamic stretches like leg swings and arm circles to prepare your body for the activity.
- After Morning Coffee: Use the time while the kettle boils for a 5-minute “movement snack” of gentle neck rolls and shoulder shrugs.
- Post-Walk: Hold gentle static stretches for 30 seconds each while your muscles are warm and receptive.
- Late Afternoon (3-5 PM): This is the ideal time for your main flexibility session, taking advantage of your peak body temperature.
- Evening: Wind down with gentle range-of-motion exercises, like ankle circles, before bed to ease tension.
Why Cable Brakes Are Harder for Arthritic Hands to Operate?
When choosing a mobility aid like a walker or rollator, we often focus on height and stability, but the braking system is just as critical for safety and comfort—especially for individuals with hand arthritis. Many standard models use cable brakes, similar to those on a bicycle, which require a strong power grip and the flexion of several finger joints to engage. For a hand affected by arthritis, this squeezing motion can be intensely painful and difficult to perform, particularly in an emergency.
A biomechanical analysis reveals why this is the case. Operating a cable brake puts direct stress on the metacarpophalangeal (MCP) and proximal interphalangeal (PIP) joints—the very knuckles and middle joints of the fingers that are often the most inflamed and painful in hand arthritis. Relying on a brake system that causes pain can lead to hesitation in using it, which is a significant safety risk. The user might not be able to apply enough force to stop quickly, or they may avoid using the brakes altogether.
Fortunately, manufacturers have developed alternative brake systems designed with these challenges in mind. These ergonomic options reduce or eliminate the need for a forceful grip, transferring the effort to larger muscle groups or requiring a simpler, less painful motion. Choosing the right brake system is a key part of “movement intelligence,” ensuring your mobility aid is a true partner in your safety.
This table compares the most common brake types and their suitability for users with hand arthritis. It highlights how a simple design choice can make a world of difference in daily use and confidence.
| Brake Type | Hand Motion Required | Force Needed | Arthritis Compatibility |
|---|---|---|---|
| Cable Brakes | Power grip + squeeze | High | Poor – causes joint pain |
| Push-Down Pressure | Lean weight on handles | Low | Excellent – minimal hand strain |
| Loop Brakes | Pull upward motion | Moderate | Good – uses different joints |
| One-Touch Locking | Single button press | Minimal | Very good – easy engagement |
Why Thick Area Rugs Are the Number One Trip Hazard for Walkers?
In our quest to make our homes cozy and comfortable, we can inadvertently introduce significant safety hazards. For a person using a walker, the number one environmental threat is often something as seemingly harmless as a thick area rug. While they add warmth and style, their edges and plushness create a perfect storm for trip-and-fall incidents, which can lead to serious injury and a loss of confidence. Understanding the physics of these incidents is the first step toward creating a safer living space.
The danger lies in the abrupt stop. When the front legs of a walker catch on the edge of a thick rug, the frame comes to a sudden halt. However, the user’s body, which was in motion, continues to move forward due to momentum. This pitches the person’s center of gravity forward, often causing them to tumble over the now-stationary walker frame. It’s a surprisingly common and dangerous scenario that can happen in an instant, even to the most careful individuals. Low-profile rugs with beveled edges or, ideally, no area rugs at all in main walkways, are much safer.
The hazard is multiplied in “rug-on-carpet” situations. Here, not only does the edge pose a threat, but the entire rug can slide or bunch up unpredictably under the walker’s legs. This creates an unstable surface that can cause a fall even if you successfully navigate the edge. The safest solution is to secure all area rugs firmly to the floor with double-sided rug tape or non-slip backing, ensuring there are no curled edges or ripples that could catch a walker’s leg. Your home should be a sanctuary, and identifying and mitigating these environmental risks is a crucial part of maintaining your independence safely.
Key takeaways
- Even small, gentle “micro-activations” performed during periods of rest are powerful tools to combat the rapid muscle loss caused by inactivity.
- Embrace a “stimulate, don’t annihilate” mindset. Use the Traffic Light System to interpret pain as a signal, ensuring exercise builds you up, not breaks you down.
- Safe balance training is progressive. Start with full support (like a kitchen counter) and gradually reduce your reliance as your stability and confidence grow.
Quad Canes vs. Standard Canes: A Phased Approach to Stability for Post-Surgery Recovery
After a surgery, such as a hip or knee replacement, choosing the right mobility aid is crucial for a safe and effective recovery. The two most common options are the quad cane (with four small feet at the base) and the standard, single-tip cane. While it might seem like a simple choice, they serve very different purposes. The quad cane offers a much wider base of support, providing maximum stability in the initial, most vulnerable phase of recovery. It stands on its own, which is a convenient feature when you need to use your hands.
However, the very stability that makes the quad cane excellent for early recovery can hinder the process of regaining a normal gait pattern long-term. Its wider base can be cumbersome and may encourage a slower, less natural walking motion. The standard cane, while offering less passive stability, promotes a more fluid gait and is much more maneuverable as your strength and balance improve. The key is to see these aids not as a permanent choice, but as tools to be used in a phased approach, graduating from one to the next as your recovery progresses.
The most empowering mindset is to view the quad cane as a “rehabilitation tool” or a “stability trainer” for a specific, limited window of time. As a Physical Therapy Research Team advises, this framing “empowers the user to see it as temporary aid for progress,” not as a marker of permanent decline. This approach, detailed in the table below, provides a clear roadmap from maximum support to confident, independent mobility.
| Recovery Phase | Cane Type | Duration | Key Benefits | Graduation Criteria |
|---|---|---|---|---|
| Phase 1 (Weeks 1-4) | Quad Cane | 3-4 weeks | Maximum stability, confidence building | Stand on recovering leg 5-10 seconds |
| Phase 2 (Weeks 4-8) | Transition Period | 2-3 weeks | Alternate between both types | Walk 50 feet without fatigue |
| Phase 3 (Week 8+) | Standard Cane | Ongoing | Improved gait, greater mobility | Navigate stairs with confidence |
Your journey to maintaining functional mobility is a marathon, not a sprint. It’s built on a foundation of smart choices, consistent effort, and a deep understanding of your body’s needs. By embracing the principles of movement intelligence—from fighting muscle loss to choosing the right mobility aid—you are taking active control of your health and independence. Start today by choosing one small, manageable action from this guide and make it a part of your routine.