
In summary:
- Mobility isn’t about adding gadgets but removing environmental friction through strategic, reversible changes.
- Create dedicated “walking lanes” of at least 36 inches wide by repositioning furniture, not removing it.
- Prioritize uniform, diffuse lighting over single bright sources to eliminate confusing shadows that can cause falls.
- Replace unstructured slippers with supportive indoor shoes to drastically improve stability and reduce trip risks.
- Focus on small adjustments to furniture height, floor surfaces, and lighting placement for the greatest impact without construction.
For seniors living in small apartments, especially those who rent, the desire for a safer, more navigable home often clashes with the reality of strict “no modification” rules and tight budgets. The common advice—install grab bars, widen doorways—feels impractical, expensive, and often impossible. This leaves many feeling stuck, navigating a space filled with small but significant daily obstacles. The constant friction of a walker catching on a rug or the strain of standing up from a low sofa isn’t just an annoyance; it’s a cumulative drain on energy and confidence.
The conventional approach to home safety is additive: buy more equipment, install more aids. But what if the most effective strategy was subtractive? What if true mobility isn’t about adding things to your home, but about intelligently removing friction from your environment? The key lies not in major construction but in re-engineering your existing space. It’s about understanding how small, strategic changes to pathways, surfaces, and light can fundamentally alter the way you move and dramatically reduce the risk of falls.
This guide abandons the costly, permanent “solutions” and focuses on a minimalist, action-oriented approach. We will deconstruct your apartment into its core functional zones—floors, furniture, and lighting—and provide a blueprint for optimizing each one. By the end, you will have a clear, actionable plan to transform your home into a space that supports, rather than hinders, your mobility, all without a single drill or contractor.
While the following video discusses financial accuracy, its core message on the importance of order and clarity provides a powerful analogy for organizing your physical space for safety. Just as precise data prevents business stumbles, a well-ordered environment prevents physical ones.
This article provides a structured approach to reclaiming your space. Each section tackles a specific, high-impact area where small adjustments yield significant improvements in mobility and safety. Follow along to create a clear, unobstructed, and secure home environment.
Summary: A Blueprint for Reclaiming Your Space
- Why Thick Area Rugs Are the Number One Trip Hazard for Walkers?
- How to Create Clear ‘Walking Lanes’ in a Cluttered Living Room?
- Furniture Risers or New Chairs: Which Is Best for Easy Standing?
- The Lighting Mistake That Creates ‘Phantom Steps’ for Dementia Patients
- When to Switch from Slippers to Indoor Shoes for Stability?
- Why PIR Sensors Fail to Detect Slow-Moving Seniors in Winter?
- Carpet vs. Hardwood: Which Surface Reduces Drag for Walkers and Wheelchairs?
- How to Position Motion-Sensor Lighting to Prevent Nighttime Falls on Stairs?
Why Thick Area Rugs Are the Number One Trip Hazard for Walkers?
Thick, high-pile area rugs are the primary source of environmental friction in many homes. For someone using a walker, the front legs don’t just glide over; they dig into the plush fibers, causing an abrupt stop. This sudden resistance forces the user to lift the walker, an action that compromises balance and significantly increases the risk of a fall. The problem isn’t just the height of the pile but the edge. An unsecured rug edge can curl or bunch, creating a small but potent tripwire. Even rugs with non-slip backing can become hazardous if they are too thick, as the transition from a hard floor to the soft, high surface creates an uneven plane.
The ideal solution is to remove them entirely from high-traffic areas. However, if a rug is necessary for warmth or sound dampening, the focus must shift to minimizing its profile. A low-pile rug (less than 1/4 inch thick) presents far less resistance. More importantly, it must be completely secured. Taping down just the corners is insufficient; the entire perimeter needs to be fastened to the floor with double-sided carpet tape to create a seamless, immovable surface. Any transition between a rug and the main flooring should be smoothed out with a beveled edge strip to eliminate any abrupt lip.
Think of your floor as a continuous pathway. Any change in texture or height is a potential point of failure. By eliminating or aggressively securing high-pile rugs, you are not just removing an object; you are engineering a smoother, more predictable surface for movement, which is the foundation of fall prevention in a small space.
Your Action Plan: 4 Steps to Reduce Rug-Related Fall Risks
- Remove all loose throw rugs and area carpets from high-traffic walking paths entirely.
- If rugs must stay, secure them with double-sided carpet tape covering the entire perimeter to prevent any edge from lifting.
- Replace any high-pile (shag) rugs with low-profile, commercial-grade mats that are under 1/4 inch in thickness.
- Install beveled transition strips at all carpet-to-hard-floor edges to create a gentle slope and eliminate abrupt trip points.
How to Create Clear ‘Walking Lanes’ in a Cluttered Living Room?
In a small apartment, the concept of a “hallway” extends into every room. A cluttered living room forces a zigzag path, demanding constant negotiation around furniture. The solution is not to get rid of your furniture, but to strategically rearrange it to create dedicated “walking lanes.” These are unobstructed, straight pathways that connect key points in your home—for example, from the front door to the sofa, or from the sofa to the kitchen. The goal is to make movement intuitive and automatic, reducing the cognitive load of navigating your own home.
The Americans with Disabilities Act (ADA) provides a crucial benchmark: accessibility guidelines specify a minimum clear pathway of 36 inches for a wheelchair. This width should be your non-negotiable standard for all primary walking lanes. A standard walker can manage with slightly less, but 36 inches provides a comfortable buffer and accommodates future needs. To achieve this, push larger pieces like sofas and bookshelves against the walls. Replace a large central coffee table with smaller end tables placed beside seating, instantly opening up the center of the room. This creates a clear, predictable route that doesn’t require constant decision-making.
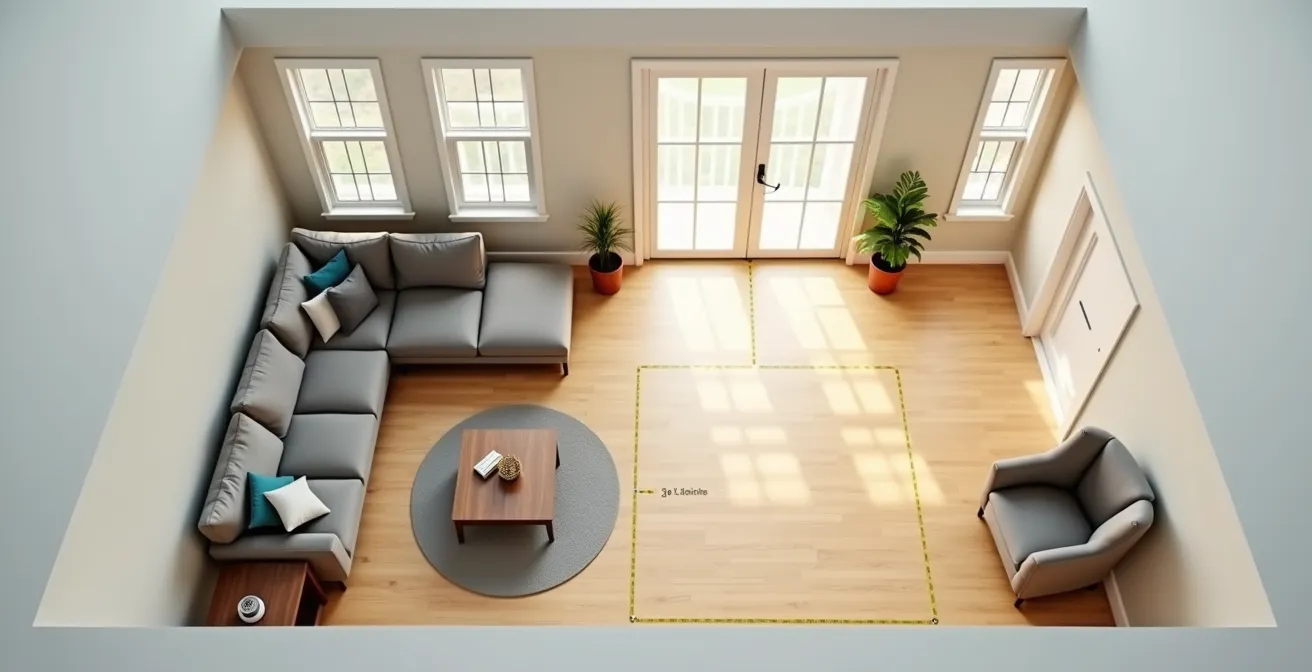
As the visual above demonstrates, thoughtful furniture placement can transform a cramped space into an open one. The specific width needed can vary slightly based on the mobility aid being used, but aiming for a more generous width ensures long-term safety and comfort.
| Mobility Aid | Minimum Width | Optimal Width |
|---|---|---|
| Walker | 32-36 inches | 42 inches |
| Standard Wheelchair | 36 inches | 42-48 inches |
| Transport Chair | 32 inches | 36 inches |
| Power Wheelchair | 36 inches | 48 inches |
Furniture Risers or New Chairs: Which Is Best for Easy Standing?
The struggle to get up from a low, soft chair is a common and draining daily battle. It’s a problem of physics and biomechanics: a deep seat and low height put your knees above your hips, removing your body’s natural leverage. While buying a new, “senior-friendly” chair is an option, it’s often expensive and unnecessary. The choice between modifying your existing furniture with risers and buying new comes down to the chair’s underlying structure.
Furniture risers are an excellent, low-cost solution if your current chair is firm and supportive. They are simple blocks that fit under the legs, raising the entire chair by 3 to 5 inches. This adjustment can be transformative, restoring the proper 90-degree angle at your knees and making it significantly easier to stand. However, risers are not a universal fix. If your chair or sofa is overly soft and deep, adding height won’t solve the core problem: a lack of a stable base to push off from. Sinking into a plush cushion absorbs the energy you need to stand, making the effort greater regardless of height.
Before you buy anything, assess your current seating. A firm cushion is non-negotiable. If your chair is supportive but just too low, risers are the minimalist, budget-friendly choice. If it’s a soft, sinking piece of furniture, no amount of height will fix the poor ergonomics, and a replacement with a firmer, shallower seat is the better long-term investment. An evaluation of the Safe at Home program found that such adjustments are highly effective; after home modifications including proper seating, nearly 70% of residents who previously had falls reported feeling they had a low or no chance of falling again.
Your Action Plan: 4-Point Biomechanical Checklist for Chair Selection
- Seat Height: Sit down. Your feet should be flat on the floor with your knees bent at a 90-degree angle. Measure the distance from the floor to the back of your knee to find your ideal seat height.
- Seat Depth: When seated with your back against the chair’s backrest, there should be 2-3 inches of space between the front edge of the seat and the back of your knees.
- Seat Firmness: Press down firmly on the cushion with your fist. For adequate support, it should not compress by more than about one inch.
- Armrest Support: Armrests are crucial for leverage. They should be positioned at a height that allows your arms to rest comfortably with your elbows bent, ready to push off.
The Lighting Mistake That Creates ‘Phantom Steps’ for Dementia Patients
The most common lighting mistake in homes is relying on a single, bright overhead fixture. This creates high-contrast environments with sharp, dark shadows. For the aging eye, and especially for individuals with dementia or cognitive decline, these shadows are not just dim areas; they can be misinterpreted as holes, obstacles, or “phantom steps” on the floor. The brain struggles to process the ambiguous visual information, causing hesitation, shuffling, and a dramatically increased risk of tripping over a non-existent threat. The solution is not necessarily more light, but more *uniform* light.
The goal is to wash the space in soft, overlapping fields of light from multiple sources. This technique, known as diffuse lighting, eliminates harsh shadows and creates a predictable, easy-to-read environment. Instead of one 100-watt bulb in the ceiling, use several lower-wattage lamps at different heights: a floor lamp in a corner, a table lamp by a chair, and under-cabinet LED strips in the kitchen and bathroom. This multi-source approach fills in the shadows that a single overhead light creates. Dimmers are also a powerful, low-cost tool, allowing you to adjust the intensity based on the time of day and prevent the jarring effect of suddenly switching on a bright light at night.
Adequate lighting is crucial for preventing falls. Motion-sensor lights that turn on as someone approaches are especially helpful in usually dim areas, reducing the cognitive load of navigating shadows that can be misinterpreted as obstacles.
– Friends & Family Home Care, Ultimate Home Safety Guide for Seniors 2024
By layering your lighting, you create a visually calm and coherent space. This reduces the brain’s workload in interpreting the environment, freeing up cognitive resources to focus on the physical act of walking safely.
Your Action Plan: Multi-Source Diffuse Lighting Strategy
- Install multiple low-wattage LED bulbs in different fixtures instead of relying on a single bright overhead light.
- Add peel-and-stick under-cabinet LED strips in the kitchen and bathroom to illuminate countertops and eliminate floor shadows.
- Position table lamps and floor lamps at various heights and in different corners to create overlapping fields of light.
- Use warm white bulbs (2700K-3000K) with a high Color Rendering Index (CRI of 90+) for more natural light and accurate color perception.
- Install plug-in or hardwired dimmer switches on key lights to adjust brightness throughout the day and avoid harsh transitions.
When to Switch from Slippers to Indoor Shoes for Stability?
The moment you notice any change in balance or an increased reliance on furniture for support is the moment to switch from slippers to indoor shoes. Traditional slippers are one of the most underestimated fall hazards in the home. They are typically backless, overly soft, and have smooth soles, offering virtually no structure, grip, or support. Your foot can easily slide out, and the compressed material provides a poor connection to the ground, interfering with the sensory feedback your feet need to maintain balance. Wearing them is akin to walking on soft, unstable platforms.
A proper indoor shoe, by contrast, is engineered for stability. Key features to look for are a closed heel to prevent the foot from slipping out, a firm, non-slip rubber sole to provide reliable traction, and a secure fastening system like Velcro or laces that holds the foot firmly in place. The structure of the shoe provides crucial ankle support, preventing twists and rolls. This is not about comfort in the “plush” sense, but about the comfort that comes from feeling stable and secure with every step. The difference in stability is not subtle; it is immediate and significant.
Case Study: The Impact of Proper Footwear
A fall prevention program run by Sunrise Senior Living identified a direct link between footwear and fall rates. They observed that residents who switched to wearing proper indoor shoes with non-slip soles and adequate ankle support experienced significantly fewer falls compared to those who continued to wear backless slippers or just socks. Their educational programs now specifically emphasize that supportive, slip-resistant footwear is a primary tool for improving balance and reducing fall risk during daily activities.
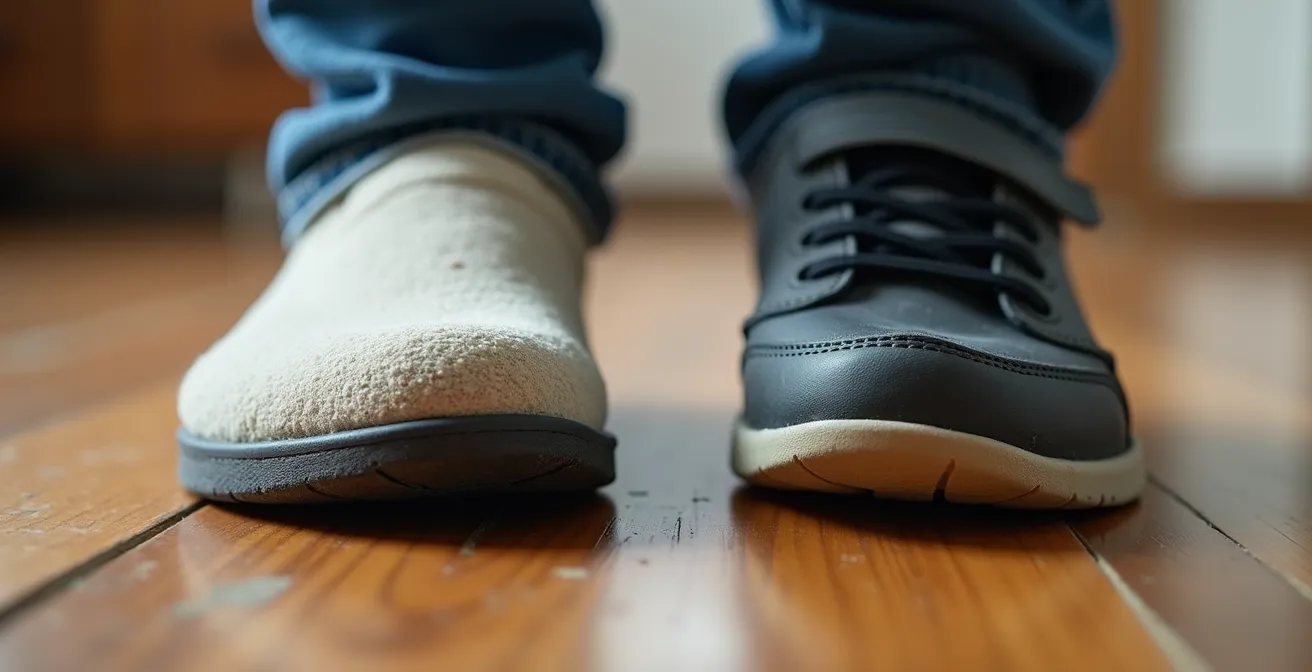
The image above clearly illustrates the difference. On the left, the collapsed structure of a worn slipper offers no support. On the right, the structured indoor shoe provides a stable base. Making this one simple switch is one of the most impactful, no-construction changes you can make for your daily safety.
Why PIR Sensors Fail to Detect Slow-Moving Seniors in Winter?
Motion-sensor lights seem like a perfect, hands-free safety solution. However, many homeowners install standard Passive Infrared (PIR) sensors, which often fail to detect slow-moving seniors, particularly in colder months. This creates a dangerous false sense of security. The problem lies in how PIR technology works: it doesn’t detect motion itself, but rather the rapid change in heat energy that occurs when a warm body moves across a cooler background. There are two key failure points for seniors.
First, slow, deliberate movement—common among those with mobility challenges—may not create a temperature shift that is fast or significant enough for the sensor to register. The person enters a dark area, expects a light to turn on, and it doesn’t. Second, heavy winter clothing, like a thick robe or sweater, acts as an insulator. It traps body heat, preventing the infrared energy from radiating outwards and reaching the sensor. The sensor, seeing no significant heat signature, remains inactive.
For reliable detection, the better technology is a microwave or radar-based motion sensor. These devices work on the Doppler effect, actively sending out low-energy waves and detecting motion by changes in the returning signal. Their performance is unaffected by a person’s speed, clothing, or ambient temperature, making them far more reliable for senior safety. If replacing existing PIR sensors isn’t an option, you can optimize their placement. Position them lower to the ground (at ankle or calf height) to detect the motion of legs and feet, and angle them to catch movement *across* their field of view rather than directly towards it, as lateral movement creates a more detectable signal.
Carpet vs. Hardwood: Which Surface Reduces Drag for Walkers and Wheelchairs?
When it comes to mobility, not all floors are created equal. The ideal flooring surface minimizes “surface drag”—the physical resistance that a floor exerts on the wheels of a walker or wheelchair. From a pure physics standpoint, a hard, smooth surface like hardwood, laminate, or luxury vinyl tile (LVT) is unequivocally superior. Pushing a walker across a polished wood floor requires minimal effort. The same action on even a low-pile carpet requires significantly more force, as the wheels sink slightly into the fibers, creating constant friction.
This increased effort is not just tiring; it can also be dangerous. To overcome the drag on carpet, a person may use a more forceful, jerky pushing motion, which can compromise balance. For wheelchair users, surface drag directly impacts their endurance and independence. While wall-to-wall carpeting can feel warmer and seem softer to fall on, its benefits are often outweighed by the mobility challenges it creates. Furthermore, the transition points between different flooring types are notorious trip hazards. In fact, comprehensive research shows that 35.7% of senior fall injuries in homes occur in bathrooms, a room where transitions between wet and dry surfaces, or between tile and a bath mat, are common.
For a renter who cannot change the flooring, the strategy is to create a “path of least resistance.” If the apartment is a mix of carpet and hard flooring, ensure that the primary walking lanes utilize the hard surfaces as much as possible. If the entire apartment is carpeted, ensure it is a low-pile, high-density commercial-grade carpet. Plush, soft carpets should be avoided at all costs. Removing unnecessary area rugs from on top of carpet is also essential, as this creates an even more unstable and high-drag surface.
Key takeaways
- Clear, 36-inch wide “walking lanes” are the foundation of a safe layout; achieve this by repositioning furniture, not eliminating it.
- Uniform, multi-source lighting is superior to a single bright light, as it eliminates confusing shadows that can be misinterpreted as obstacles.
- Structural support is key: firm chairs that facilitate standing and structured indoor shoes that prevent slips are more important than soft comfort.
How to Position Motion-Sensor Lighting to Prevent Nighttime Falls on Stairs?
Stairs are the single most hazardous area in any home, and navigating them at night is particularly treacherous. Effective lighting here is not just about brightness, but about placement and direction to eliminate both darkness and glare. The goal is to create a “cascade of light” that activates before you reach the stairs, illuminates every tread, and guides you safely without blinding you. According to safety experts, this is a critical intervention, as every 11 seconds an older adult is treated in an emergency room for a fall.
Every 11 seconds, an older adult is treated in the ER for a fall. Proper stair lighting that illuminates treads without causing glare is crucial, as descending stairs is statistically more dangerous than ascending.
– Caring Senior Service, Fall Prevention Fact Sheet 2025
The most common mistake is placing a single motion sensor at the top or bottom of the stairs. This often means the light turns on *after* you’ve already taken the first step into darkness. Instead, motion sensors should be placed 3-4 feet before the first step, both at the top and bottom landings. This “upstream” placement ensures the lights are on and the path is fully visible before you commit to ascending or descending.
The lighting itself should be low and directed downward. Peel-and-stick LED light strips installed along the baseboard or under the edge of the treads are an excellent no-construction solution. They cast light directly onto the stair treads, clearly defining each edge. These should be supplemented with small puck lights under the handrail to illuminate the pathway. Crucially, all lights should be angled downward to prevent glare. A light shining into your eyes is just as dangerous as darkness, as it causes temporary flash blindness and ruins your night vision. Using warm or amber-colored lights (around 2200K) provides sufficient illumination while being less disruptive to your natural night vision.
By implementing these strategic, non-destructive changes, you are not just making your apartment safer; you are redesigning it for effortless living. The next logical step is to perform a systematic audit of your own space, using these principles as your guide to identify and eliminate sources of environmental friction.
Frequently Asked Questions on Indoor Mobility
Why do standard PIR sensors fail to detect seniors in winter clothing?
PIR sensors detect rapid changes in infrared energy. Heavy winter clothing insulates body heat, and slow movement doesn’t create enough temperature differential for detection.
What’s the best alternative to PIR sensors for senior homes?
Microwave or radar motion sensors use the Doppler effect to detect movement regardless of temperature, clothing, or speed, making them more reliable for seniors.
How can I optimize existing PIR sensors without replacement?
Position sensors lower (ankle height), angle them to detect lateral movement across their field, and ensure they’re placed before stairs or transition areas, not at them.