A grab bar is only as strong as its installation; a poorly mounted bar is more dangerous than no bar at all.
- Leverage is determined by precise placement (vertical for pulling, horizontal for stabilizing) and requires understanding the load dynamics of a slip or fall.
- Secure anchoring into tile demands specific tools (diamond-tipped bits) and techniques to preserve both the tile and the wall’s critical waterproofing envelope.
Recommendation: Treat this installation not as a simple DIY task, but as a critical safety engineering project focused on zero-failure load support.
Installing a grab bar in a tiled shower is not a decorative choice; it is a critical safety upgrade that can prevent life-altering falls. For the skilled DIYer or handyman, the goal isn’t just to mount a bar on the wall. The true objective is to create a fail-safe anchor point capable of withstanding the sudden, dynamic force of a person losing their balance. This requires a shift in mindset from simple home improvement to precision safety engineering. Many guides offer basic ADA height recommendations, but they often fail to address the underlying physics of leverage, the material science of drilling into modern porcelain, or the structural requirements for a truly secure mount.
This guide moves beyond the templates. We will dissect the strategic differences between vertical and horizontal placement based on biomechanics. We will detail the professional, step-by-step process for drilling through dense tile without causing catastrophic cracks. Most importantly, we will focus on the concept of substrate integrity—ensuring that the anchor is secured to a solid structure, not just the tile veneer. The difference between a properly installed grab bar and one that creates a false sense of security lies in this meticulous attention to detail. This isn’t about making it look good; it’s about ensuring it performs flawlessly when it matters most.
To navigate this technical guide effectively, the following sections break down each critical aspect of a professional-grade installation, from initial placement strategy to the final waterproofing of your anchor points.
Summary: A Structural Guide to Shower Grab Bar Installation
- Why Vertical Bars Help Entry While Horizontal Bars Aid Balance?
- How to Drill into Porcelain Tile Without Cracking It for Anchor Points?
- Suction Cup vs. Screw-Mounted Bars: Which Can You Trust with Your Life?
- The Towel Rack Error That Causes Severe Bathroom Falls
- How to Match Grab Bars with Modern Faucets to Avoid the ‘Hospital Look’?
- Sponge Bath vs. Shower Chair: Which Is Less Stressful for Dementia Patients?
- Certified Aging-in-Place Specialist vs. General Contractor: Who to Hire for Safety?
- Converting a Tub to a Curbless Shower: How to Waterproof the Subfloor Correctly?
Why Vertical Bars Help Entry While Horizontal Bars Aid Balance?
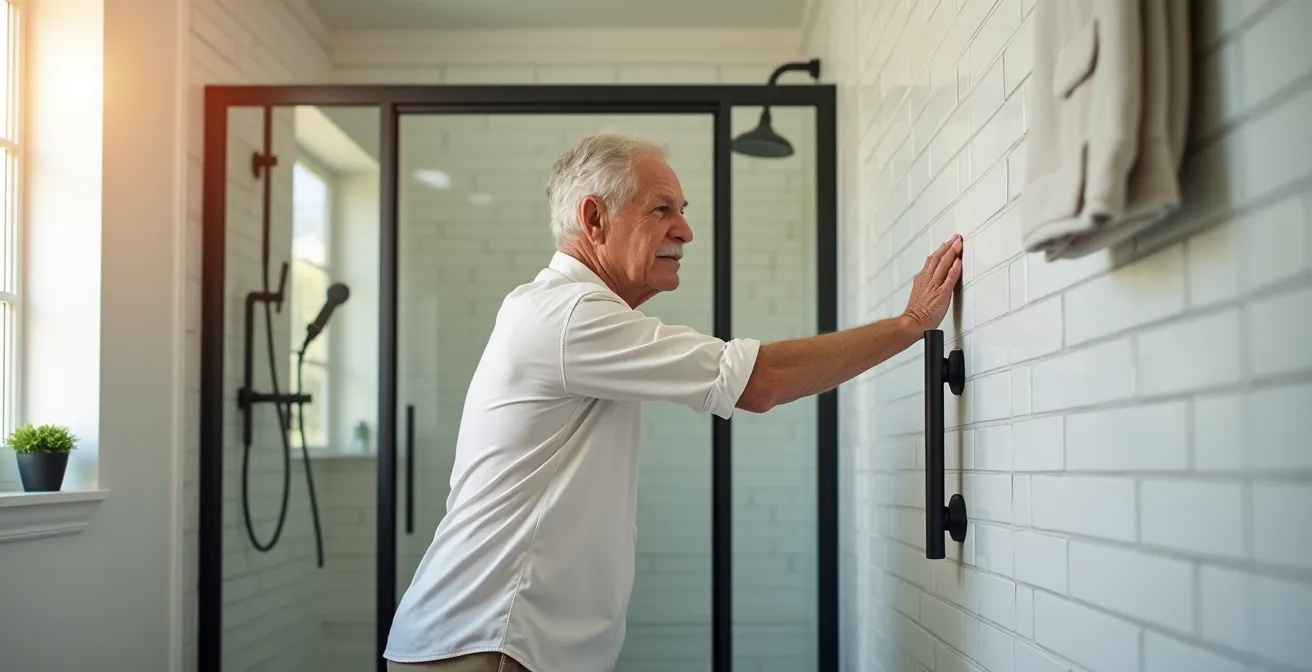
The orientation of a grab bar is not arbitrary; it’s dictated by biomechanics and the specific movements it’s meant to support. The decision between vertical, horizontal, or diagonal placement directly impacts its effectiveness in providing leverage and stability. A one-size-fits-all approach misses the opportunity to create a truly customized and safer environment. Understanding the function behind the form is the first step in a professional installation.
A vertical bar, typically placed near the shower entrance, facilitates a natural pulling or climbing motion. When stepping over a tub ledge or onto a slippery surface, the hand-over-hand movement on a vertical bar provides continuous support throughout the entry or exit process. For optimal leverage, it should be installed 4 to 6 inches from the shower entrance. In contrast, a horizontal bar is designed for stabilization while standing or lowering oneself. Installed at waist height (typically 33 to 36 inches from the floor), it allows a person to maintain their center of gravity and steady themselves against a slip. This is critical for tasks like washing feet or bending over.
Diagonal bars offer a hybrid solution, providing varied heights for both pulling and stabilization. However, the most critical insight comes from understanding how these placements affect fall recovery. In fact, research published in the Human Factors journal shows a 75.8% higher balance recovery rate when individuals can use a grab bar during a slip. For specific conditions, such as unilateral weakness from a stroke, placing a vertical bar on the user’s stronger side is paramount. This level of customization is what separates a standard installation from a truly effective safety feature.
How to Drill into Porcelain Tile Without Cracking It for Anchor Points?
Drilling into porcelain tile is the most intimidating step of the installation, and for good reason. Unlike softer ceramic, porcelain is incredibly dense and brittle. An incorrect technique will not only crack the expensive tile but can also compromise the waterproofing envelope behind it. Success requires the right tools and a patient, methodical process that prioritizes heat reduction and stability.
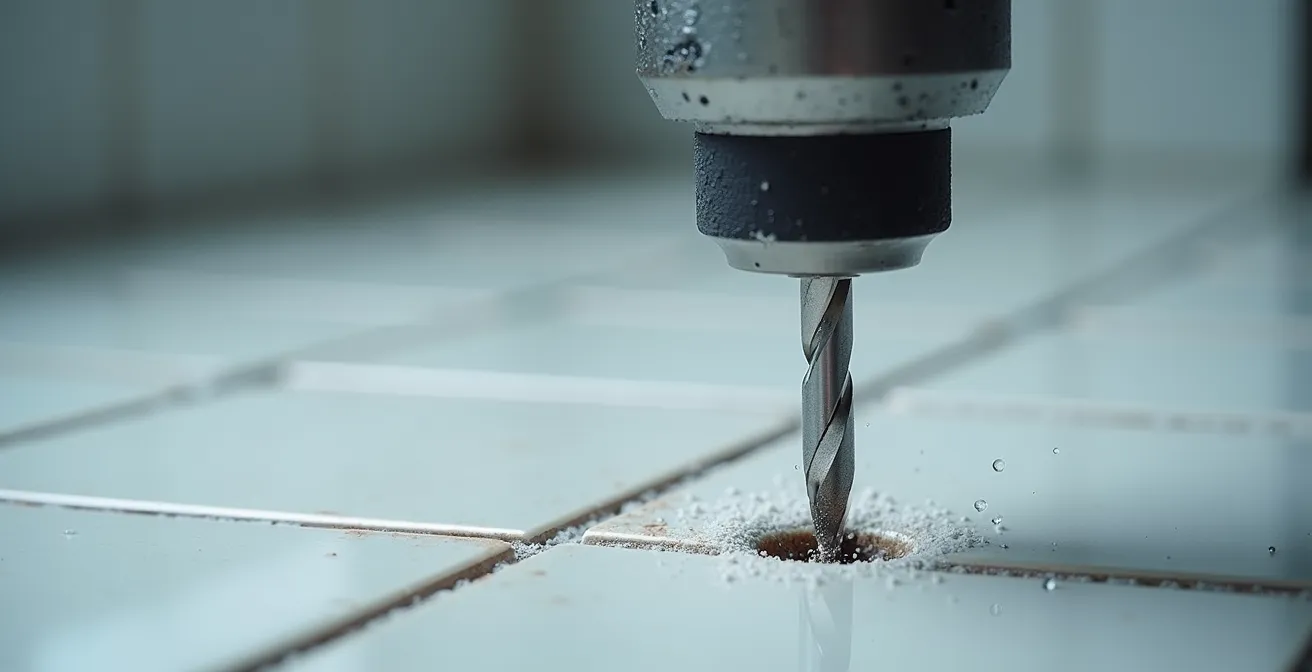
The single most important tool is the drill bit. Standard masonry bits will fail; you must use a carbide-tipped or diamond-tipped masonry bit designed specifically for porcelain. Diamond-tipped bits, though more expensive, offer the cleanest cut and longest life. The technique is just as crucial as the tool:
- Mark and Tape: Apply masking tape over the drill points. This prevents the bit from “walking” on the slick tile surface and provides a cleaner entry point.
- Start at an Angle: Begin drilling at a slow speed and a 45-degree angle to create a small notch. Once the bit has a purchase, slowly and smoothly pivot the drill to a 90-degree angle.
- Low Speed, Steady Pressure: High speed creates excessive heat, which is the primary cause of cracking. Use a low RPM and apply firm, steady pressure without forcing the drill. Let the bit do the work.
- Cool the Bit: Heat is the enemy. Continuously cool the bit and tile surface with a small stream of water or by creating a small dam of plumber’s putty around the hole and filling it with water.
- Address the Substrate: Once through the tile, switch to an appropriate bit for the material behind it (e.g., a wood bit for a stud).
If a stud is not available at the desired location, do not use standard plastic anchors. You must use a professional-grade hollow wall anchor system designed to distribute the load.
Professional Anchoring: The SNAPTOGGLE System
When stud placement is not ideal, systems like SNAPTOGGLE Heavy Duty Toggle Bolts are the solution. Requiring only a 1/2-inch hole, these anchors flip into position behind the wall substrate (e.g., cement board). When tightened, they distribute the immense pull-out force of a fall across a wide area of the substrate’s back, far exceeding the 250-pound ADA requirement. This method provides a secure mount in hollow walls where other anchors would fail.
Suction Cup vs. Screw-Mounted Bars: Which Can You Trust with Your Life?
In the world of bathroom safety, there is no debate: a screw-mounted grab bar is the only device you can trust to support your full body weight. Suction cup “grab bars” are widely available and appeal to those hesitant to drill into tile, but they provide a dangerously false sense of security. They are not designed, rated, or safe for supporting a person during a slip or fall. Understanding the mechanism of their failure is key to rejecting them as a viable safety option.
A suction cup relies on creating a vacuum against a perfectly smooth, non-porous surface. However, many factors in a bathroom environment lead to inevitable failure. Temperature and humidity fluctuations cause the plastic cup to expand and contract, breaking the seal. Over time, the material itself becomes less pliable. Furthermore, many tiles, even if they appear glossy, have microscopic pores or slight surface texture that prevent a perfect, lasting vacuum. The result is that a suction bar can feel secure one moment and release without warning the next, often at the precise moment it is needed most. With nearly 80% of bathroom injuries among seniors involving slips or falls, according to 2023 CDC data, relying on such an unpredictable device is an unacceptable risk.
A screw-mounted bar, by contrast, is anchored directly to the structural substrate of the wall—either a wooden stud or through robust hollow-wall anchors. Its holding power is not dependent on atmospheric pressure or surface finish. It is a permanent, mechanical connection designed to withstand hundreds of pounds of dynamic load—the sudden, jerking force of a fall. A properly installed, screw-mounted bar is an engineered safety device. A suction cup bar is, at best, a light-duty handle for steadying oneself, and at worst, a catalyst for the very fall it’s meant to prevent.
The Towel Rack Error That Causes Severe Bathroom Falls
One of the most common and dangerous mistakes in bathroom safety is grabbing a towel rack for support. Visually, it seems like a plausible handhold, but structurally, it is designed for a completely different purpose and type of force. This misunderstanding leads to catastrophic failures and is a significant contributor to the over 235,000 emergency room visits from bathroom falls annually in the U.S. alone. The distinction lies in the physics of its installation and the forces it is meant to resist.
A towel rack is designed to resist a few pounds of shear force—the downward weight of a wet towel. Its mounting hardware, often small plastic drywall anchors, is sufficient for this static, vertical load. However, a slip or fall exerts hundreds of pounds of pull-out force—a sudden, dynamic load pulling directly away from the wall. The small plastic anchors have virtually zero resistance to this type of force and will rip out of the drywall or tile with shocking ease.
The experts at Family Handyman Magazine put it best in their installation guide, highlighting the fundamental design flaw of using a towel rack for support:
Towel racks are installed with small plastic anchors designed to resist a few pounds of shear force from a towel. A fall exerts hundreds of pounds of pull-out force, for which these anchors have virtually zero resistance.
– Family Handyman Magazine DIY Experts, Bathroom Grab Bar Installation Guide
In contrast, a grab bar is installed with heavy-duty screws driven at least 1.5 inches into solid wood blocking or studs, or with specialized hollow-wall anchors that distribute the load over a large surface area. This is a system engineered specifically to handle immense pull-out forces. Treating a towel rack as a grab bar is not just a bad idea; it is a predictable point of failure in a critical moment.
How to Match Grab Bars with Modern Faucets to Avoid the ‘Hospital Look’?
A primary objection to installing grab bars is the fear of creating a clinical, institutional aesthetic. However, modern design has evolved far beyond the sterile chrome bars of the past. Today’s market embraces the principles of Universal Design, creating products that are both beautiful and functional. The key is to treat grab bars as an integrated part of the bathroom’s hardware scheme, not as a medical afterthought. In fact, the market has seen a 65% rise in demand for “invisible” safety features that blend seamlessly into the decor.

Achieving a high-end, cohesive look is about coordinating finishes, textures, and forms. Instead of trying to hide the grab bar, select one that complements the existing fixtures. A matte black grab bar can be a stunning design element when paired with matching faucets and a shower head. A brushed nickel or satin brass finish can add warmth and elegance. The goal is intentional design, not reluctant compliance.
Here are several strategies for integrating grab bars stylishly:
- Match the Finish: Choose finishes like brushed nickel, matte black, or satin brass to perfectly match your faucets, shower head, and other hardware.
- Select a Stylish Diameter: Opt for bars with a 1.25 to 1.5-inch diameter. This range is compliant with ADA guidelines for a secure grip but also feels more refined and less industrial.
- Use Dual-Function Fixtures: Many manufacturers offer stylish fixtures that double as grab bars, such as toilet paper holders, towel holders, or corner shower shelves with integrated support.
- Coordinate Textures: Look for consistent textures (e.g., knurled, brushed, smooth) across all your bathroom hardware for a truly custom and deliberate design feel.
- Consider Contrast for Safety: While matching is good for style, a contrasting color (e.g., black bar on white tile) offers 72% better visibility for those with low vision, a key principle of safe design.
Sponge Bath vs. Shower Chair: Which Is Less Stressful for Dementia Patients?
While a sponge bath might seem like a gentler alternative, for many individuals with dementia, maintaining the routine of showering can be crucial for dignity and orientation. The key to making this experience less stressful lies in creating an environment of absolute security, and grab bars play a vital role beyond mere physical support. For a person with cognitive impairment, a grab bar becomes a cognitive anchor, a predictable and reassuring element in an otherwise potentially overwhelming sensory experience.
The fear of falling is a major source of anxiety during showering for dementia patients. A shower chair helps, but the transition into and out of the chair, and the movements during washing, still present challenges. As noted by a study on bathing safety for this population, high-contrast grab bars serve as powerful visual cues that prompt appropriate hand placement and reduce anxiety. A matte black bar on a white tile wall is not just a design choice; it is a clear, unmissable guidepost. This visual certainty, combined with the tactile feedback of a solid, unmoving object, can transform the experience.
As researcher Alison C. Novak from the KITE Research Institute highlights, this tactile element is profoundly important:
For a dementia patient, the fear of falling compounds the sensory overload of a shower. The tactile certainty of a solid grab bar provides a constant sense of security.
– Alison C. Novak, KITE Research Institute, Toronto Rehabilitation
When the shower environment is made secure with strategically placed, high-contrast grab bars, the use of a shower chair becomes a far less stressful option than a sponge bath. It allows the individual to maintain a familiar routine in a space that has been engineered for both physical and psychological safety. The grab bar is no longer just a handle; it’s a constant, reliable presence that grounds the user, making the shower a place of comfort rather than fear.
Certified Aging-in-Place Specialist vs. General Contractor: Who to Hire for Safety?
When the decision is made to hire a professional, it’s crucial to understand that not all contractors have the specialized knowledge required for a safety-critical installation. A general contractor may be excellent at tiling or plumbing, but a Certified Aging-in-Place Specialist (CAPS) has specific training in the unique needs of older adults, including the science of fall prevention and Universal Design. The impact is significant, as professionally installed safety modifications can lead to profound results; for example, homes with properly installed grab bars see a 61% reduction in fall-related ER visits.
A CAPS professional will conduct a thorough assessment of the user’s specific needs, mobility, and strength to determine optimal placement, rather than just defaulting to standard ADA guidelines. They understand the critical importance of solid blocking, proper anchor selection for different substrates, and meticulous waterproofing. They think not just about today’s needs, but about how needs might change in the future.
Whether you’re hiring a professional or tackling the job yourself, holding the work to a professional standard is non-negotiable. An installer’s expertise is revealed by the questions they ask and the answers they provide. Before allowing anyone to drill into your shower, you must vet their knowledge.
Your Installer Vetting Checklist: 5 Critical Questions to Ask
- Anchor Strategy: What specific type of hollow-wall anchors will you use if no stud is present, and why is it superior for pull-out force?
- Waterproofing: How, specifically, will you waterproof the drill penetrations to prevent water intrusion behind the tile and protect the wall substrate?
- Customization: Can you explain why you’re choosing this specific height and location for my needs, rather than just the standard code?
- Future-Proofing: Do you have experience installing solid blocking within the wall during a renovation for future grab bar placement flexibility?
- Credentials: Can you provide references from similar aging-in-place or accessibility modification projects you have completed?
An installer who can answer these questions confidently and precisely demonstrates a true understanding of safety engineering. One who cannot is only guessing with your well-being.
Key Takeaways
- Function Dictates Form: Vertical bars are for pulling (entry/exit), while horizontal bars are for stabilizing (standing/sitting). Placement must be based on biomechanics.
- Drilling is a Science: Use only a diamond-tipped bit with low speed, steady pressure, and constant water cooling to prevent cracking porcelain tile.
- Anchoring is Everything: Never rely on suction cups or towel racks. A grab bar must be anchored into solid wood studs/blocking or with professional-grade hollow-wall anchors like toggle bolts.
Converting a Tub to a Curbless Shower: How to Waterproof the Subfloor Correctly?
The ultimate safety upgrade is often a full bathroom renovation, such as converting a tub into a curbless, walk-in shower. This project presents the perfect opportunity to implement a truly professional, future-proof grab bar strategy from the ground up. The most critical considerations during such a renovation are installing solid blocking within the walls and ensuring a flawless waterproofing system, especially around any penetrations you will make for grab bars and other fixtures.
Installing “blocking” is the gold standard. This involves fixing horizontal pieces of 3/4-inch plywood or 2×6 lumber between the wall studs at the key heights where grab bars might ever be needed. This creates a continuous, solid anchor surface across the entire wall. It frees you from the tyranny of 16-inch stud spacing, allowing you to mount a grab bar at the exact, perfect location for maximum leverage, now or ten years from now. This foresight saves thousands in costs and avoids complex retrofitting later.
Equally important is protecting this new structure from water. When you drill through your tile and backer board to mount the grab bar, you are creating a potential point of entry for moisture. A simple bead of silicone around the flange is a temporary, budget solution that will fail over time. A professional approach requires an integrated waterproofing system.
The table below outlines common waterproofing methods for penetrations. A system like Schluter-Kerdi provides specialized seals that integrate with a full sheet membrane, creating a continuous, unbreachable waterproofing envelope.
| Waterproofing Method | Application | Longevity | Cost |
|---|---|---|---|
| Schluter-Kerdi System | Membrane with specialized seals | 20+ years | Premium |
| Silicone Sealant | Applied around mounting flanges | 5-10 years | Budget |
| Epoxy-Based Systems | Chemical bond waterproofing | 15+ years | Mid-range |
| Integrated Gaskets | Factory-sealed mounting hardware | 10-15 years | Moderate |
Ultimately, a successful and safe grab bar installation rests on this professional mindset. By understanding the forces at play, using the correct tools and techniques, and planning for long-term integrity, you can ensure that this simple device provides true, reliable security when it is needed most. Evaluate your needs, assess your walls, and execute the installation with the precision it deserves.